Showing posts with label Basic Introduction. Show all posts

Monday, October 17, 2011

World’s Smallest Car

World‘s Smallest Car

One more uniqueness of man-made related to the car, the car was named “Peel P50“. uniqueness of this car is from its very small. This is one of the world‘s smallest car.


mabil aneh 05 Worlds Smallest Car

This car only has a length of 134 cm and width 99 cm, weighing 59 kg.
In addition Peel P50 car had only one door on the left side, one wiper (cleaning windshield – red) and a headlamp.
a car that only had 3 wheels it can only load one adult passenger and a bag of groceries.
And who would not even look safe d road so small, but the car was allowed to ride on the streets of Britain.
the car itself was made in 1963 and 1964 as many as about 50 pieces and when it is sold under the 200 pound sterling (approximately USD 3,564,910).

But now, the car remaining 20 pieces that the price could reach 35,000 pounds (about USD 623 859 250) to 50,000 Poundsteling (approximately USD 891,227,500) and is considered as urban car.
The smallest car that reportedly had entered the museum Riple’s Believe It Or Not! and will be shown with 800 items / other things that have been shown by Riple’s Believe It Or Not!.

Sunday, August 7, 2011

In the section What to Edit After the Upload Template

Once you upload the template, your task is still unfinished. Youmust first edit the new template. For example, replace the defaultlink of the template. Or replace the navbar link. Then, how to edittemplates? It's easy. Follow the instructions from my


First
Sign In at Blogger
After you Sign In, Click Menu Design Then click the menu again EDIT HTML


Second
Once you open the menu EDIT HTML, Find the code is
To speed up the search using CTRL + F

<data:blog.title/> </ title>

Once you find the above code. Bottom of the code will have code like the one in the picture below


- Change the fill DESCRIPTION BLOG YOU with Your Blog Short Stories
- Change the Fill Keyword | Blog You the KEYWORDS that youspecify


Once replaced, the order will be like this


Third
To replace or add a navbar menu, find this code
As usual, to speed up the search, use the CTRL + F

<a href='http://testimoni-ritricks.blogspot.com' rel='nofollow'>Home </ a> </ li>

After the above code is found, replace the links that were therewith a link address of your blog.

To add a navbar menu, copy this code

<a href='#' rel='nofollow'> Title </ a> </ li>

and place it right under the code

<a href='http://testimoni-ritricks.blogspot.com' rel='nofollow'>Home </ a> </ li>

be a structure like this

<a href='http://testimoni-ritricks.blogspot.com' rel='nofollow'>Home </ a> </ li>
<a href='#' rel='nofollow'> Title </ a> </ li>


Description:
-Replace the # sign with your URL
-Replace Title with your URL

If so, click Save Template. And now you've finished template in the edit.

Uploading Template Method

Okay. On this occasion, I will give a tutorial on How to Upload Template. If in a previous post how to change my template from blogger, now is a way to replace the template with our own templates. So, if you want to change the template, no need to use a template from blogger, we also can replace with our own templates. Follow the instructions from me. 


Things need to be prepared is, you should download the template first. You can download the template in the site template provider. As in Zoom Template
Blog Template 4 U


Or you can also download templates from me. You can dowonload HERE. Preview template is like this 


While the appearance of the menu design is like this 


If you are interested, you can download it by clicking HERE. Templates are available with the AUTO READ MORE. 
After you download, it's time you upload the template. First Sign In at http://www.blogger.com After you Sign In, please go to the menu design. 


Second Once you open the Design menu, there will be a display like this.Click the EDIT HTML Menu 


Third Once you open the HTML EDIT menu, there will be a display like this. Then select the template you've downloaded by clicking the SELECT FILE. 


Fourth Once you select a file, click UPLOAD like the picture below. 


 If there look like the picture below 

 Click Delete Widget Because if not removed will be bad for our blog. 
Fifth After the UPLOAD, there will be a notice like the picture below 


The figure indicates that the template we have successfully replaced. Now see the look of your blog. Thank you for reading my article.

Wednesday, August 3, 2011

How to Change Blogger Templates

You feel bored with your current template? Take it easy. I have a solution for you. You do not need to worry. Due to the bloggertemplate can be changed anytime.
Jump to the tutorial course. Follow the steps below


First Sign In to http://www.blogger.com
Once you sign in, you'll get something like the picture below.Click the menu design. As in the picture below


Second
After you click the menu design, click the menu again TemplateDesigner. Wait until the process is complete. Once the processis complete, will look like below


Third
Choose a template according to your choice. If so, click APPLY to BLOG located on the upper right corner. Then click on Back To BLOGGER. Now look at your new template.


Thank you for reading my article.

How to Remove a Widget on Blogger

Not long ago I was giving a tutorial how to install a widget onblogger. Well, this time I will discuss is the opposite of that.Namely how to remove a widget on blogger. Follow the step


First  
Sign In first to http://www.blogger.com
If you already Sign In, there will be a display like this
Click the design


Second
If you've opened the menu design, you'll get something like this


Third
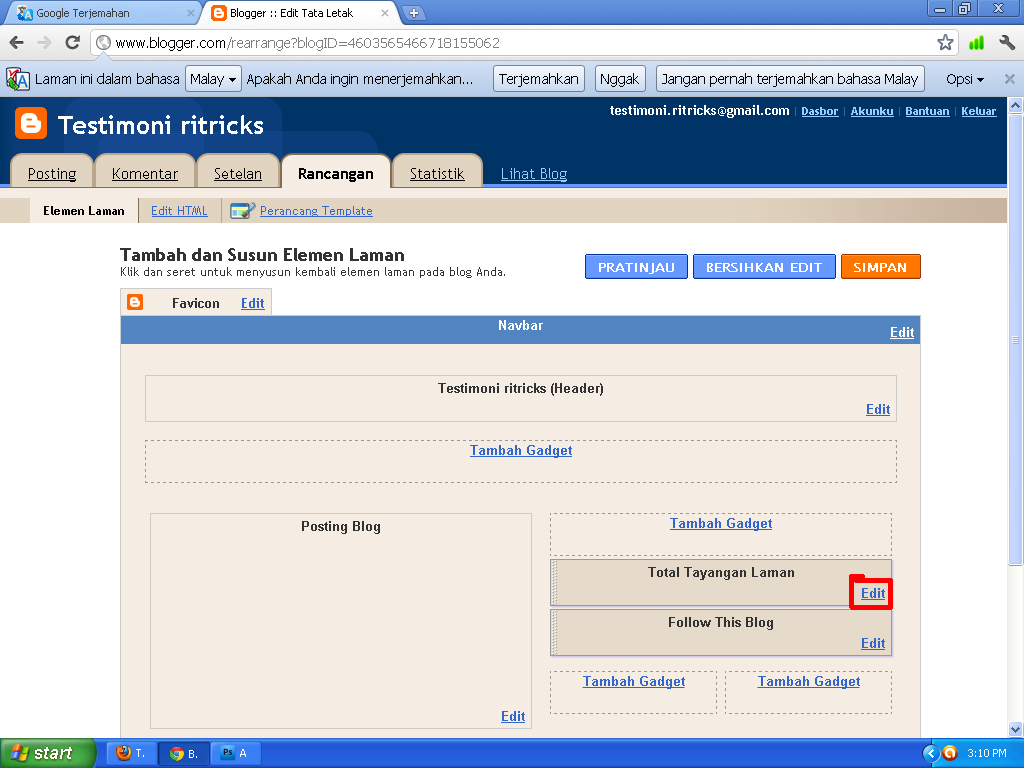
Select the widget to be deleted. For example widget TOTALimpressions page. If you want to delete the widget, click EDIT onthe widget. Like the picture above.
 

Fourth
After you click on EDIT, will emerge a new window. as shown below. Then click Delete.


If it is removed, there will be display as shown below


Congratulations. You have successfully deleted your widget.Thank you for reading the tutorial from me.

Monday, August 1, 2011

Adds Widget In Blogger

If on the first article, I just explained about the notion PageElements course, now I will teach you how to add widgets to bloggers.


First
Sign In first in http://www.blogger.com
Once In Your Sig, you will get something like this. Click on the DESIGN.


Second
After that, click Add Widget.


NB: For this problem, it's up to you, you would click the AddWidget on which part. Depending on each person.
 

Third
After you click the Add Widgets, automatically there will be a newpicture windows like this


Fourth
Select the widget you want. Blog Stats example. If you choose toadd the Blog Stats widget, click the Plus sign on the right as shown above.


If you already click the plus sign, click SAVE. As shown in the figure below.


Now you see your blog. what were the results. For in my blog, the result is like this


Congratulations. You have successfully made the widget. Thank you for reading my article.

How To Write Articles On Blogger

If you're new in the world of bloggers, you should and must followthis tutorial. Because of all the tutorials bloggers, the mostimportant thing is about How To Write Articles On Blog.


Follow the steps below
1. Sign In at http://www.blogger.com
2. Once you sign in on blogger, you'll get something like this


3. Click the New Entry. After you click New Entry, you will get something like this


- Title: Write Article Title Here Your Blog

4. If so, click Publish Post

You have successfully publish your article. Thank you for readingmy article.